(read GARDENING WITH MITTLEIDER part I first)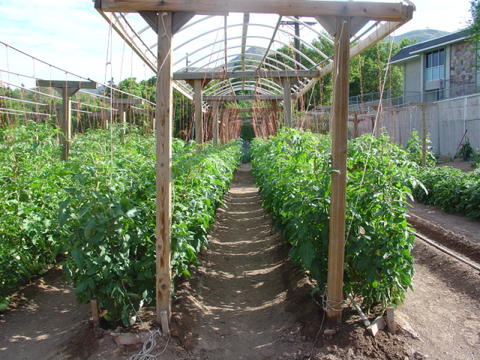
Hey everyone- oh my goodness these videos are a bear to upload!! I have been trying to do them at night so that we can use the computer during the day, but sometimes they're not done in the morning so we've had to cancel the almost done uploads several times. bleh. I thought I'd post the first four vids and a few tips up to that point and then on part III I'll continue to give tips and show videos. My plants have been in for a week and a half now and actually started sprouting 2 days after. I love Arizona!
Hey everyone- oh my goodness these videos are a bear to upload!! I have been trying to do them at night so that we can use the computer during the day, but sometimes they're not done in the morning so we've had to cancel the almost done uploads several times. bleh. I thought I'd post the first four vids and a few tips up to that point and then on part III I'll continue to give tips and show videos. My plants have been in for a week and a half now and actually started sprouting 2 days after. I love Arizona!
The cucumbers won the sprouting race

ok, here are some of my notes from the seminar:
Control 6 Elements for Success:
1. Light
Your plants must have full sunlight all day long! No trees, shrubs, fences. Plants can even shade themselves. Prune off excess sucker stems so there is plenty of air and light.
2. Temperature
Seed usually don't germinate until they reach 75-80 degrees. If your climate is a cold one, you can build a mini frame around your rows and cover it with greenhouse plastic (uv protected). If your climate is too hot, use the same frame but cover it with 30% white shade cloth (30% is maximum- you can go lower). And only cover in the hottest parts of the day. Plants will stop fruiting once the temperature reaches 95 degrees.
3. Air
Plants receive air through the roots- they need soil air. No standing water, so avoid flooding. Make your beds 2 inches above the height of the walk ways to promote drainage.
If you have a problem with clay soil, make your beds and then mix in sand to make up 30% of the bed and your problem is solved.
If you are container gardening, use sawdust and 30% sand to fill instead of dirt. This helps with air supply, drainage, and spread of nutrients given to the plants.
4. Water
A plant is a continuous water pipe from the tip of the smallest root to the top of the highest leaf.
When you first water your seeds keep the beds wet until they sprout. After that, water once a day first thing in the morning -1 inch of water in the bed and that's it. if you live somewhere especially wet and dry like AZ you may need to water 2x a day in the summer. If your plant is wilting it is dying, so watch your plants to see if they need more water.4. Water
A plant is a continuous water pipe from the tip of the smallest root to the top of the highest leaf.
If you have a problem with salinity (salt) in the soil, create the beds, then flood it three times and it will get the salt far enough down away from the planting area that your plants wont be affected.
It is important to have level beds so that all nutrients given to the plants will stay and soak into the soil where they are placed, rather than running to the lowest point of the bed when watered. (I have a video of how to level the beds coming soon)
Water only the root zone of the plant. *Do not sprinkle* this will water weeds, waste water and promote disease. Try your hardest to not get the rest of the plant wet when you water- this just promotes disease as mentioned. If you automate water using an above the ground drip system it will be easier, faster, and more efficient. Using 3/4 inch #200 psi pvc piping (painted with exterior paint) and drill 3 #57bit holes every 4 inches. Set this on a 6"long 2x4 to suspend above root zone. (when I make mine I will video and post)
5. Food
A plant can not grow beyond it's most limiting factor. In my opinion food is, in most cases, the most limiting factor. There are plenty of the nutrients that your plant needs in most soil, however, many are bonded to other elements and cannot be absorbed by the roots, so they do you no good. The food given to plants must be water soluble and available to roots. The 13 natural mineral nutrients needed for the best growth and health of the plant are:
A plant can not grow beyond it's most limiting factor. In my opinion food is, in most cases, the most limiting factor. There are plenty of the nutrients that your plant needs in most soil, however, many are bonded to other elements and cannot be absorbed by the roots, so they do you no good. The food given to plants must be water soluble and available to roots. The 13 natural mineral nutrients needed for the best growth and health of the plant are:
Major Elements
- Nitrogen
- Phosphorus
- Potassium in the form of Potash
Otherwise known as NPK and is available at any garden center. You will need 16-16-16. 16-16-16 is the relative percentage % of Nitrogen (N), Phosphorous (P), and Potassium(K) .
Plants use these nutrients to develop different parts; N builds strong leaves, Phosphate builds strong roots, and Potash promotes root development and disease resistance.
Plants use these nutrients to develop different parts; N builds strong leaves, Phosphate builds strong roots, and Potash promotes root development and disease resistance.
Secondary Elements
- Calcium
- Sulfur (Ca and Sulfur are found in gypsum)
- Magnesium (epsom Salt)
Trace Elements
- Zinc
- Boron
- Manganese
- Iron
- Copper
- Chloride
- Molybdenum
A continutous supply of these elements is best, so feed them every week! I will include the fertilizer recipes at the bottom of this post.
6. Competition
weeds, bugs, animals
Weed early and often. do not use mulch. keep ground dry and bare.
Prevent disease and bugs! Pick fruits as soon as they are ripe and prune your plants so that no leaves are touching the ground (we will be training all our plants UP). Clear the ground of any trimmings and pull out and dispose of plants as soon as they are done fruiting. Do not let fruit rot on the plant. Do not let your plants get over-watered.
Other notes:
A lot of people are concerned about the pH of the soil. For us in the southwest, the pH of soil is fixed when you add the preplant mix with gypsum. To determine if your soil is acidic or alkaline, a good rule of thumb is: any place that gets more than 20" of rain a year is acidic and any place that gets less than 20" is alkaline. If you live somewhere with more than 20" of rain a year, replace the gypsum in the preplant recipe with pulverized lime or garden lime. A good gardening pH is 6.
The fertilizer recipes are as follows:
Preplant mix
80 parts gypsum (find in a large bag at most gardening stores)
4 parts Epson salt (Found at the drug store in First Aid)
1 part Boron (found at most grocery stores in the laundry isle as BORAX laundry booster)
Remember these are parts not percents. Add to center of the isles once they are made and leveled. cut into soil until you cant really see it anymore and then level again. You don't want to add before isles are made because it's a waste of fertilizer. You will be adding 1 oz or 2 tablespoon per square foot.
Weekly Feed
25 lb bag NPK
4 lbs Epsom Salt
10oz of Magic Mix (I get this from the foodforeveryone.org website. It has the trace elements that are very hard to find, and when they are found can only be purchased in large quantities. Foodforeveryone has small bags with all of it mixed in the correct proportions. Either only mix as you need it or invest in some perlite to add so that once mixed, it doesn't get wet and goopy. )
Apply 1/2 oz or 1 Tbs per square foot close to, but not touching the plant. Do not work into soil (except when you are adding it along with the preplant mix), just water it and it will gradually dissolve into soil. When to apply: with the preplant mix, 3 days after all sprouts come up, and then once per week until after harvest.
Here are the first four videos. Please excuse what a horrible tutorial maker I am and my pants that are falling off during all these videos. I pulled the pants out of the dryer before they were completely dry so they never got set in their real shape, got stretched out in the first 2 minutes, and were huge in me all day during all these videos. Also, as you can see by the shadows in the videos, I didn't follow the mittleider method completely in getting full sun, but the important thing is to do the best with what you have. You have no excuse to not be gardening!
ok, I actually said the wrong amount to apply on this video- it's 2Tbs per square foot. The weekly feed is 1 Tbs per running square foot. Sorry about that! Just mix up a bunch and share your left overs with your neighbors! That's what I've been doing!
GARDENING WITH MITTLEIDER part III
ok, I actually said the wrong amount to apply on this video- it's 2Tbs per square foot. The weekly feed is 1 Tbs per running square foot. Sorry about that! Just mix up a bunch and share your left overs with your neighbors! That's what I've been doing!


Wow! I could kiss you, Steph, for doing this! I wasn't going to do this method until NEXT year, because I don't have time to figure it out on my own. Now I think I can do it!
ReplyDeleteBless your heart!
Are you going to do part III any time soon? (smile)
Love you!
Mom
Oh yes, forgot to mention. How do I turn off your music....I could hardly hear you on the video...music was great, but I didn't need it right then.
ReplyDeleteLove Mom
Thanks for posting all of this Steph. Are you still taking the classes, I wish I could take them with you. Let me know.
ReplyDeleteAlso, with the LIGHT section, he reccomends full sun all day. Does he even say that for the summer? Because its so hot here, that most plants need afternoon shade. Let me know how it works.
note to Karen and everyone reading this: yes, he recommends planting in a place with full sun. if it gets too hot, invest in some 30% white shade cloth for only the hottest parts of the day. As my garden plot is next to my porch, they wont be getting full sun all day long, but my kids have their little box garden in full sun, so it will be interesting to compare the two.
ReplyDeleteIn case you're interested, here is a recipe for a smaller batch of weekly feed:
ReplyDelete2 1/2 pounds (40 ounces) - 16-16-16
6 ounces Epsom
1 ounce Micro-Mix
Hi - thanks for your tutorial! I am mid way through my first season with the Mittleider Method. I too, had to tweak a bit as there isn't much room in my urban back yard. But after two miserable years, I finally have a beautiful and very productive garden! Thanks for simplifying the process here. It really does work, glad I didn't give up on producing my own -potatoes, onions, corn, carrots, peas, cucumbers, tomatoes, peppers, strawberries, blackberries and herb garden. Hey-that's a lot of produce in a 20' x 25' area! And it is a challenge living in California's hot Central Valley. I'll be checking back to see how you do in the heat. I've got my fingers crossed for melons and few other plants I'm putting out now and I'll get some shade cloth now too. Thanks again for the helpful tips!
ReplyDeleteKim! I now live in the central valley, too! Bakersfield, baby!
Delete