Sunday, November 1, 2009
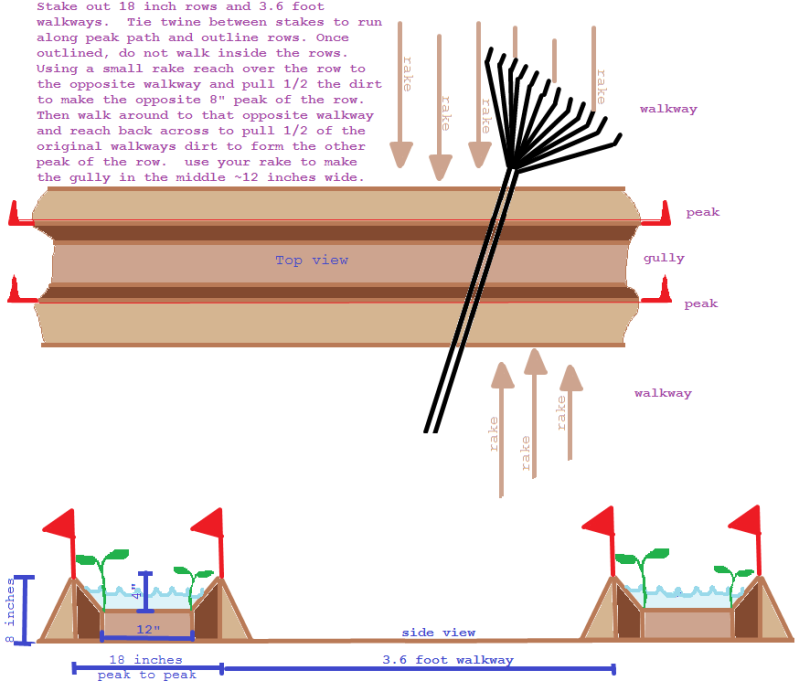
How to make rows!
Here is a diagram of how to make your rows Mittleider style- please click on it to see the full view. A video tutorial is also available on Gardening with Mittleider part II


Saturday, October 31, 2009
How to Transplant
I think the most transplanted plant would have to be basil. You buy your little plant from a Sprouts or Fresh and Easy and take it home and plant it. Easy, right? Then why is it dead now?


At the Preparedness fair this morning I had a lot of questions from people about how to transplant a plant without killing it- Good question!
It is best to transplant at night and if at all possible, during a rainy season. Take the plant out of the container it's in along with all of the dirt it's planted in (trying not to break too many roots). We want to protect the roots as much as possible! Gently loosen the roots in the dirt and plant into moist soil, packing roots in pretty good so they have contact with the new soil. Water it liberally.
Watch your plant after it's been transplanted and if it looks like it's suffering, water it with some dilluted liquid Sea Kelp/Seaweed that you can get at your local garden store- I've even found it at Walmart of all places. This comes in a large jug, however, you will only be using a small amount in this process and this jug will last you years. Once I was taught this I never lost another plant to transplant shock! YAY!
Saturday, June 20, 2009
7-week progress


Hey y'all! These are pictures from my 7 week progress. sorry I'm posting this so late- I took these pics and videos right before girls camp so didn't post them and then I got home on the 13th, took pictures again and didnt post them because I have been exhausted cleaning, getting dental work done (yes, I know, when will it end?), and a ton of other stuff. I had a sleeping bag stolen off of my porch by the way (I left the camping stuff out there and have been gradually putting things away. grr.
Tuesday, June 2, 2009
6-week Progress and Garlic!
Hey y'all! Here is the 6 week progress video(s). I took two different videos and I like both so I'm showing both :o)
Also, I dug our garlic up, braided the roots together and hung it to dry! I'm sad that I only harvested 2 of them- the others I had to dig up and transplant to pots to make room for the garden in April and I wasn't able to save them- the larger of these two was transplanted and did alright but I had three die on me :o( I ripped too many roots. I can't wait to plant some more in October! What fun!


Also, I dug our garlic up, braided the roots together and hung it to dry! I'm sad that I only harvested 2 of them- the others I had to dig up and transplant to pots to make room for the garden in April and I wasn't able to save them- the larger of these two was transplanted and did alright but I had three die on me :o( I ripped too many roots. I can't wait to plant some more in October! What fun!

Sunday, May 24, 2009
Tuesday, May 19, 2009
4-week progress
Click here for the 3-week progress. You will be amazed at how much all of this stuff has grown in a week. Here is a video of my garden in it's 4th week of existance. I'll do a tutorial on the pvc watering system for you guys if you want, just let me know. It was a lot of fun and it now takes about 1 minute to water my garden. awesome.
If you haven't read about the garden, please see
GARDENING WITH MITTLEIDER part I
GARDENING WITH MITTLEIDER part II
GARDENING WITH MITTLEIDER part III
If you haven't read about the garden, please see
GARDENING WITH MITTLEIDER part I
GARDENING WITH MITTLEIDER part II
GARDENING WITH MITTLEIDER part III
Wednesday, May 13, 2009
I CANT...STOP...EATING....
 This is a serious problem..... I have these tomatoes ripening left and right and they are soooo good. I'm actually quite surprised I love them so much because I'm not really a tomato person. and definitely not a cherry tomato person. I hate the feeling of the tomato bursting in your mouth. yuck. I do not like tomatoes in salad, but I do like a good tomato sliced thick with salt and pepper. mmmmm. these are perfect for that (even though they are small) they are so yummy with a little s&p. yay for the first veggies yielded from my delectable garden.
Tuesday, May 12, 2009
3-WEEK Progress
Below is a video of my garden after 3 weeks- I have since thinned the plants (this means that since I planted 2 or more seeds in each spot, I had to choose the biggest healthiest plant and eliminate/pull out the others) and they have grown a lot mot more- even after 2 more days.
If you haven't read about the garden, please see
GARDENING WITH MITTLEIDER part I
GARDENING WITH MITTLEIDER part II
GARDENING WITH MITTLEIDER part III
If you haven't read about the garden, please see
GARDENING WITH MITTLEIDER part I
GARDENING WITH MITTLEIDER part II
GARDENING WITH MITTLEIDER part III
Sunday, May 10, 2009
Gardening with Mittleider part III
Before reading this post, please be sure to read:
GARDENING WITH MITTLEIDER part I
GARDENING WITH MITTLEIDER part II

- by the way, Matthew has his own small shovel now :o)
I have the rest of the initial videos downloaded and so here is part III: (while some of these things seem simple to a lot of us, not everyone here has even picked up a shovel, so, there you go.)
So basically just wrap the end of a dishtowel around the end of your hose and rubberband it in place. Lay the towel-hose at the end of the row between the peaks, turn the water on low and let it seep out to fill up the row 1" deep full of water. I water mine every morning so they are watered and ready to face the HEAT! 105 degrees today! I need to get my shade cloth! (we will talk about this soon)
GARDENING WITH MITTLEIDER part I
GARDENING WITH MITTLEIDER part II

- by the way, Matthew has his own small shovel now :o)
I have the rest of the initial videos downloaded and so here is part III: (while some of these things seem simple to a lot of us, not everyone here has even picked up a shovel, so, there you go.)
So sorry about the tutu folks. Welcome to my life :o)
This one is really dark, SO sorry!
So basically just wrap the end of a dishtowel around the end of your hose and rubberband it in place. Lay the towel-hose at the end of the row between the peaks, turn the water on low and let it seep out to fill up the row 1" deep full of water. I water mine every morning so they are watered and ready to face the HEAT! 105 degrees today! I need to get my shade cloth! (we will talk about this soon)
Tuesday, April 28, 2009
Gardening with Mittleider part II
(read GARDENING WITH MITTLEIDER part I first)
Hey everyone- oh my goodness these videos are a bear to upload!! I have been trying to do them at night so that we can use the computer during the day, but sometimes they're not done in the morning so we've had to cancel the almost done uploads several times. bleh. I thought I'd post the first four vids and a few tips up to that point and then on part III I'll continue to give tips and show videos. My plants have been in for a week and a half now and actually started sprouting 2 days after. I love Arizona!
Hey everyone- oh my goodness these videos are a bear to upload!! I have been trying to do them at night so that we can use the computer during the day, but sometimes they're not done in the morning so we've had to cancel the almost done uploads several times. bleh. I thought I'd post the first four vids and a few tips up to that point and then on part III I'll continue to give tips and show videos. My plants have been in for a week and a half now and actually started sprouting 2 days after. I love Arizona!
The cucumbers won the sprouting race

ok, here are some of my notes from the seminar:
Control 6 Elements for Success:
1. Light
Your plants must have full sunlight all day long! No trees, shrubs, fences. Plants can even shade themselves. Prune off excess sucker stems so there is plenty of air and light.
2. Temperature
Seed usually don't germinate until they reach 75-80 degrees. If your climate is a cold one, you can build a mini frame around your rows and cover it with greenhouse plastic (uv protected). If your climate is too hot, use the same frame but cover it with 30% white shade cloth (30% is maximum- you can go lower). And only cover in the hottest parts of the day. Plants will stop fruiting once the temperature reaches 95 degrees.
3. Air
Plants receive air through the roots- they need soil air. No standing water, so avoid flooding. Make your beds 2 inches above the height of the walk ways to promote drainage.
Control 6 Elements for Success:
1. Light
Your plants must have full sunlight all day long! No trees, shrubs, fences. Plants can even shade themselves. Prune off excess sucker stems so there is plenty of air and light.
2. Temperature
Seed usually don't germinate until they reach 75-80 degrees. If your climate is a cold one, you can build a mini frame around your rows and cover it with greenhouse plastic (uv protected). If your climate is too hot, use the same frame but cover it with 30% white shade cloth (30% is maximum- you can go lower). And only cover in the hottest parts of the day. Plants will stop fruiting once the temperature reaches 95 degrees.
3. Air
Plants receive air through the roots- they need soil air. No standing water, so avoid flooding. Make your beds 2 inches above the height of the walk ways to promote drainage.
If you have a problem with clay soil, make your beds and then mix in sand to make up 30% of the bed and your problem is solved.
If you are container gardening, use sawdust and 30% sand to fill instead of dirt. This helps with air supply, drainage, and spread of nutrients given to the plants.
4. Water
A plant is a continuous water pipe from the tip of the smallest root to the top of the highest leaf.
When you first water your seeds keep the beds wet until they sprout. After that, water once a day first thing in the morning -1 inch of water in the bed and that's it. if you live somewhere especially wet and dry like AZ you may need to water 2x a day in the summer. If your plant is wilting it is dying, so watch your plants to see if they need more water.4. Water
A plant is a continuous water pipe from the tip of the smallest root to the top of the highest leaf.
If you have a problem with salinity (salt) in the soil, create the beds, then flood it three times and it will get the salt far enough down away from the planting area that your plants wont be affected.
It is important to have level beds so that all nutrients given to the plants will stay and soak into the soil where they are placed, rather than running to the lowest point of the bed when watered. (I have a video of how to level the beds coming soon)
Water only the root zone of the plant. *Do not sprinkle* this will water weeds, waste water and promote disease. Try your hardest to not get the rest of the plant wet when you water- this just promotes disease as mentioned. If you automate water using an above the ground drip system it will be easier, faster, and more efficient. Using 3/4 inch #200 psi pvc piping (painted with exterior paint) and drill 3 #57bit holes every 4 inches. Set this on a 6"long 2x4 to suspend above root zone. (when I make mine I will video and post)
5. Food
A plant can not grow beyond it's most limiting factor. In my opinion food is, in most cases, the most limiting factor. There are plenty of the nutrients that your plant needs in most soil, however, many are bonded to other elements and cannot be absorbed by the roots, so they do you no good. The food given to plants must be water soluble and available to roots. The 13 natural mineral nutrients needed for the best growth and health of the plant are:
A plant can not grow beyond it's most limiting factor. In my opinion food is, in most cases, the most limiting factor. There are plenty of the nutrients that your plant needs in most soil, however, many are bonded to other elements and cannot be absorbed by the roots, so they do you no good. The food given to plants must be water soluble and available to roots. The 13 natural mineral nutrients needed for the best growth and health of the plant are:
Major Elements
- Nitrogen
- Phosphorus
- Potassium in the form of Potash
Otherwise known as NPK and is available at any garden center. You will need 16-16-16. 16-16-16 is the relative percentage % of Nitrogen (N), Phosphorous (P), and Potassium(K) .
Plants use these nutrients to develop different parts; N builds strong leaves, Phosphate builds strong roots, and Potash promotes root development and disease resistance.
Plants use these nutrients to develop different parts; N builds strong leaves, Phosphate builds strong roots, and Potash promotes root development and disease resistance.
Secondary Elements
- Calcium
- Sulfur (Ca and Sulfur are found in gypsum)
- Magnesium (epsom Salt)
Trace Elements
- Zinc
- Boron
- Manganese
- Iron
- Copper
- Chloride
- Molybdenum
A continutous supply of these elements is best, so feed them every week! I will include the fertilizer recipes at the bottom of this post.
6. Competition
weeds, bugs, animals
Weed early and often. do not use mulch. keep ground dry and bare.
Prevent disease and bugs! Pick fruits as soon as they are ripe and prune your plants so that no leaves are touching the ground (we will be training all our plants UP). Clear the ground of any trimmings and pull out and dispose of plants as soon as they are done fruiting. Do not let fruit rot on the plant. Do not let your plants get over-watered.
Other notes:
A lot of people are concerned about the pH of the soil. For us in the southwest, the pH of soil is fixed when you add the preplant mix with gypsum. To determine if your soil is acidic or alkaline, a good rule of thumb is: any place that gets more than 20" of rain a year is acidic and any place that gets less than 20" is alkaline. If you live somewhere with more than 20" of rain a year, replace the gypsum in the preplant recipe with pulverized lime or garden lime. A good gardening pH is 6.
The fertilizer recipes are as follows:
Preplant mix
80 parts gypsum (find in a large bag at most gardening stores)
4 parts Epson salt (Found at the drug store in First Aid)
1 part Boron (found at most grocery stores in the laundry isle as BORAX laundry booster)
Remember these are parts not percents. Add to center of the isles once they are made and leveled. cut into soil until you cant really see it anymore and then level again. You don't want to add before isles are made because it's a waste of fertilizer. You will be adding 1 oz or 2 tablespoon per square foot.
Weekly Feed
25 lb bag NPK
4 lbs Epsom Salt
10oz of Magic Mix (I get this from the foodforeveryone.org website. It has the trace elements that are very hard to find, and when they are found can only be purchased in large quantities. Foodforeveryone has small bags with all of it mixed in the correct proportions. Either only mix as you need it or invest in some perlite to add so that once mixed, it doesn't get wet and goopy. )
Apply 1/2 oz or 1 Tbs per square foot close to, but not touching the plant. Do not work into soil (except when you are adding it along with the preplant mix), just water it and it will gradually dissolve into soil. When to apply: with the preplant mix, 3 days after all sprouts come up, and then once per week until after harvest.
Here are the first four videos. Please excuse what a horrible tutorial maker I am and my pants that are falling off during all these videos. I pulled the pants out of the dryer before they were completely dry so they never got set in their real shape, got stretched out in the first 2 minutes, and were huge in me all day during all these videos. Also, as you can see by the shadows in the videos, I didn't follow the mittleider method completely in getting full sun, but the important thing is to do the best with what you have. You have no excuse to not be gardening!
ok, I actually said the wrong amount to apply on this video- it's 2Tbs per square foot. The weekly feed is 1 Tbs per running square foot. Sorry about that! Just mix up a bunch and share your left overs with your neighbors! That's what I've been doing!
GARDENING WITH MITTLEIDER part III
ok, I actually said the wrong amount to apply on this video- it's 2Tbs per square foot. The weekly feed is 1 Tbs per running square foot. Sorry about that! Just mix up a bunch and share your left overs with your neighbors! That's what I've been doing!
Friday, April 17, 2009
Gardening with Mittleider part I
If I haven't spoken to you about the Mittleider Method Seminar given by Jim Kennard I went to a few weeks back, I'm sorry. I plan to remedy that in this here post. You must find out about this way cool way to garden with less water, less money, and in any kind of soil. It's awesome. Jim Kennard has been a humanitarian missionary for the lds church because of his knowledge of this method and along with Jacob Mittleider, Jim (the President of the FoodForEveryone Foundation) has traveled the world teaching people how to garden the smart way, boosting the economy of many third-world countries (and some not so third-world). I have so many stories about this but I'm only going to tell you about one since I want to keep your attention!
In Papua New Guinea they were having problems with cannibalism. Whenever a tribal war was won, the winning tribe would eat the losing tribe. People were getting Creutzfeldt-Jakob disease (the human version of mad-cow disease-allegedly contracted from eating the brains of a member your species) which causes dimentia, speech impairment, jerky movements (myoclonus), balance and coordination dysfunction (ataxia), changes in gait, rigid posture, and seizures. Usually people will die within weeks to months of getting it and there is no known cure. The Australian military came in and put a stop to the cannibalism, but then the people needed a new primary source of food. They sustained their tribes on sweet potatoes, but not well. In the area that Jacob Mittleider visited, the hospital and school were about to be shut down because they couldn't feed the people the necessary 5lbs of potatoes per day. After Mittleider came and showed them how to garden his way, their sweet potatoes were 5 times as large as they used to be and were grown quicker and so yeilded more crops per year. They were able to sell and barter their sweet potatoes and thrived as farmers. One boy who was taught this method, Sir Silas Atopare, grew to become President of Papua New Guinea from 1997-2003.
AMAZING???? I know!
So, with that being said, I am going to continue into my first installment of "Gardening with Mittleider." At the free seminar, we were given a handout that I will share with you about how the rows are supposed to look and how this method differs from traditional gardening.
In Papua New Guinea they were having problems with cannibalism. Whenever a tribal war was won, the winning tribe would eat the losing tribe. People were getting Creutzfeldt-Jakob disease (the human version of mad-cow disease-allegedly contracted from eating the brains of a member your species) which causes dimentia, speech impairment, jerky movements (myoclonus), balance and coordination dysfunction (ataxia), changes in gait, rigid posture, and seizures. Usually people will die within weeks to months of getting it and there is no known cure. The Australian military came in and put a stop to the cannibalism, but then the people needed a new primary source of food. They sustained their tribes on sweet potatoes, but not well. In the area that Jacob Mittleider visited, the hospital and school were about to be shut down because they couldn't feed the people the necessary 5lbs of potatoes per day. After Mittleider came and showed them how to garden his way, their sweet potatoes were 5 times as large as they used to be and were grown quicker and so yeilded more crops per year. They were able to sell and barter their sweet potatoes and thrived as farmers. One boy who was taught this method, Sir Silas Atopare, grew to become President of Papua New Guinea from 1997-2003.
AMAZING???? I know!
So, with that being said, I am going to continue into my first installment of "Gardening with Mittleider." At the free seminar, we were given a handout that I will share with you about how the rows are supposed to look and how this method differs from traditional gardening.
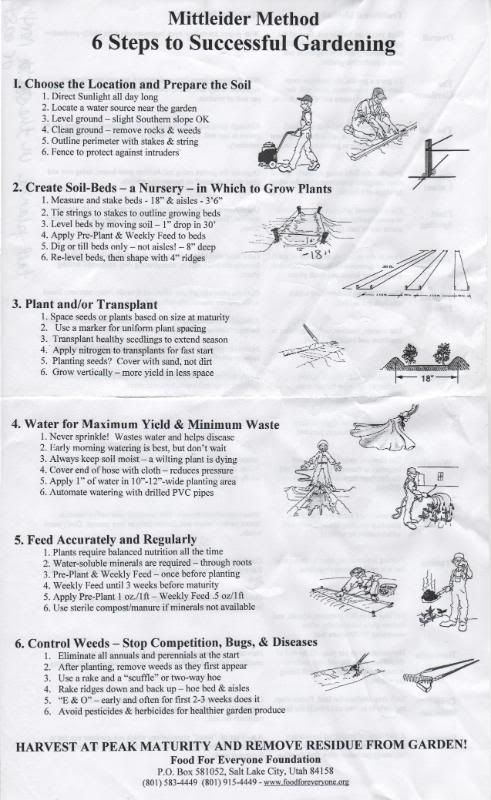
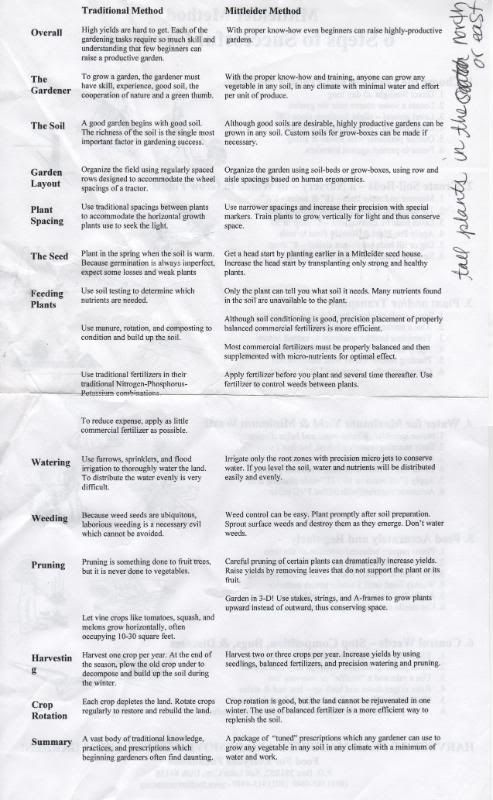
If you want me to email you these notes so they're easier to read, just let me know. Also, if you click on them they will become a tiny bit larger.
Here is a little bit about the Method from Jim Kennard:
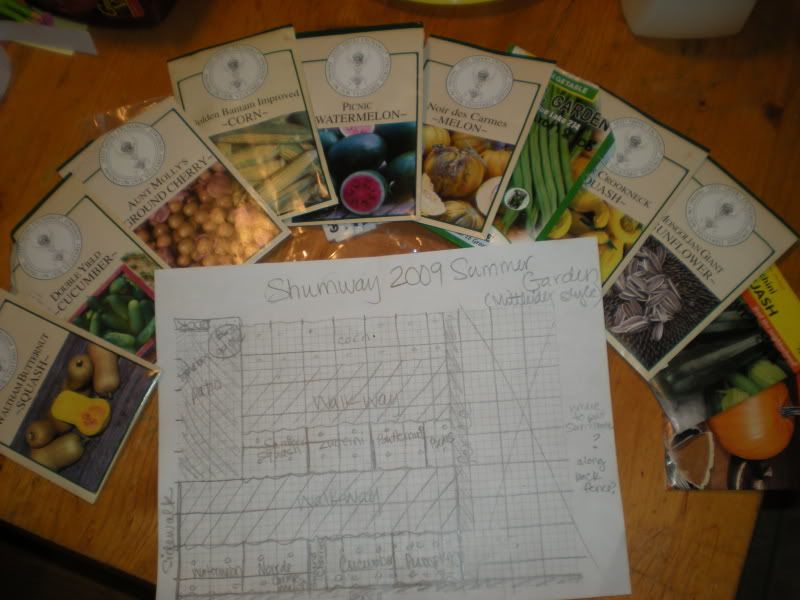
Here is my garden planning vid:
Sorry about that weird little bit about the Frankenstein corn dog. I'm such a freak.
In the next installment I will provide videos of me making my beds, leveling the beds, and the awesome sand-planting of the seed. How exciting, right? ha ha- you know you're interested! Show me the love by commenting so I know I have people interested in reading about this!
PS- If you're a gardener, here is a Gardening Journal from FFE foundation you might appreciate
GARDENING WITH MITTLEIDER part II
GARDENING WITH MITTLEIDER part III
Saturday, February 28, 2009
Garden Tour
I decided to make this garden tour a post of it's own instead of adding it to the last post. That's so it will show up as a change on my blog and people will actually come and check it out :o). I just need to apologize for how annoying I am in this video. sorry. Listen to the way i say peppers- what the heck kind of accent is that? Also, I turn the vid on it's side at times but it eventually turns back, so just bear with me!
Since then.....
My tomato and pepper plants are twice as big as they are in the movie and it's only a week later!
Since then.....
My tomato and pepper plants are twice as big as they are in the movie and it's only a week later!

My mixed greens have grown and I cleaned up all the dead leaves- looks a little more appetizing, eh? When you saw my brussel sprout plant in the video, were you wondering where the actual sprouts were?
 Here they are! On the top of each branch next to the trunk of the plant are small darker green balls- one per branch. Those will grow in to the brussel sprouts. Aren't plants interesting??
 Here are the carrots we picked today! Nice and big! We are picking them a little at a time so that they don't go to waste.
  We shared this yummy carrot today- it was a little bitter near the bottom, but as the carrot got bigger it got sweeter and yummier.
 Right Megan?
Monday, February 9, 2009

Friday, October 3, 2008
Preparedness

"Dear Brothers and Sisters:
Our Heavenly Father created this beautiful earth, with all its abundance, for our benefit and use. His purpose is to provide for our needs as we walk in faith and obedience. He has lovingly commanded us to “prepare every needful thing” (see D&C 109:8) so that, should adversity come, we may care for ourselves and our neighbors and support bishops as they care for others. We encourage Church members worldwide to prepare for adversity in life by having a basic supply of food and water and some money in savings. We ask that you be wise as you store food and water and build your savings. Do not go to extremes; it is not prudent, for example, to go into debt to establish your food storage all at once. With careful planning, you can, over time, establish a home storage supply and a financial reserve. We realize that some of you may not have financial resources or space for such storage. Some of you may be prohibited by law from storing large amounts of food. We encourage you to store as much as circumstances allow. May the Lord bless you in your home storage efforts. "
-The First Presidency
Hi all. I thought I'd post a little about what is taking over my life lately. I have been really trying to get our house in order for calamities that are unavoidable. Bluntly put, but I'd rather not sugarcoat anything so you know how serious I am. I'm not scared, I just know it needs to get done. Every time we go shopping I get more canned food than I know what to do with. Any basic necessity I buy, I buy extra of. Yesterday I bought 4 deodorants. Aaron said, "Stephanie I have two already." I said, "I know, but wouldn't you be sad if you didn't have any?" I bought more soap when I saw it was on sale. I buy at least 10 of anything canned that's under 60 cents (as long as it's not canned peas, YUCK!!!). I am educating myself about emergency preparedness, alternative energy and gardening. Right now is the time to be planting your fall gardens. Use this chance to learn about gardening. Seeds should be part of your food storage. For Preparedness info, please look at http://www.iwillprepare.com/ , provident living section of lds.org and thanks, Hannah, for this link: http://safelygatheredin.blogspot.com/ .
If you are in the valley of the sun (Arizona) here are a few more resources you should look up:
Cheap water barrels:
Email Bill at Westinaz4@aol.com
Right now is the time to plant your fall garden! If you want to garden, I have a friend who will come and prepare your soil for you (for a fee)
Email Tom at thomaspbogle@gmail.com
If you'd like to attend an organic gardening class come to ASU East campus every other Saturday at 6:30am with $5 in your pocket and you'll learn a ton!
Email me if you're interested- demanieshs@yahoo.com
Every week, I will post a preparedness tutorial or tip. This week, it's about food storage breakfasts:

(From Sandy Leonard in my ward)
"I recently read from a newscaster his suggestions on storing food for a couple of months and his idea was to eat oatmeal every morning for breakfast. This is a good idea for a number of reasons:
1. The cannery sells oats already canned or you can can your own
2. I ate oatmeal as a child and as a teen almost every morning and I am still not tired of it
3. It is inexpensive
4. You can prepare it by soaking it overnight or by soaking it for a couple of hours in the morning rather than cooking it
5. You can add raisins, craisins, blueberries, banana chips, cinnamon, honey, etc. for variety
I purchase oat groats from Sprouts @ 79 cents/lb & soak them 1/2 C oat groats: 3/4 C water, or less. Before eating I add cayenne pepper, sea salt to taste, flax oil, & soaked seeds, i.e. sunflower, flax, sesame, etc. It is filling, healthy, and inexpensive.
It is good to eat small portions of food throughout the day rather than one big meal once a day. I have sooo much energy when my last meal is @ 4:00pm then my body can fully digest what I have eaten for the day rather than being overtaxed in digesting food all through the night. Less food versus more food = energy if it is nutritious food."
"I recently read from a newscaster his suggestions on storing food for a couple of months and his idea was to eat oatmeal every morning for breakfast. This is a good idea for a number of reasons:
1. The cannery sells oats already canned or you can can your own
2. I ate oatmeal as a child and as a teen almost every morning and I am still not tired of it
3. It is inexpensive
4. You can prepare it by soaking it overnight or by soaking it for a couple of hours in the morning rather than cooking it
5. You can add raisins, craisins, blueberries, banana chips, cinnamon, honey, etc. for variety
I purchase oat groats from Sprouts @ 79 cents/lb & soak them 1/2 C oat groats: 3/4 C water, or less. Before eating I add cayenne pepper, sea salt to taste, flax oil, & soaked seeds, i.e. sunflower, flax, sesame, etc. It is filling, healthy, and inexpensive.
It is good to eat small portions of food throughout the day rather than one big meal once a day. I have sooo much energy when my last meal is @ 4:00pm then my body can fully digest what I have eaten for the day rather than being overtaxed in digesting food all through the night. Less food versus more food = energy if it is nutritious food."
INVITATION TO EVERYONE READING THIS IN DRIVING DISTANCE OF GILBERT, AZ
Families Safely Gathered In
 Higley Stake Preparedness Fair
 November 1, 2008
7:00 – 10:00
Pancake breakfast from 7-8:30 booths open til 10
In the LDS Chapel parking lot on Recker & Warner
Featuring:
· Menus & recipes for 3-month emergency storage
· Gardening
· Herbs and their uses
· First aid
· Long and short term water storage
· Fingerprinting & DNA kits
· Integrating the cannery in daily living – menus & recipes
· Food preservation methods
· Solar cooking and fuel storage
· Humanitarian displays
· And more . . . .
Sunday, September 21, 2008
SPROUTS!
 "Wanted! A vegetable that will grow in any climate, will rival meat in nutritive value, will mature in 3 to 5 days, may be planted any day of the year, will require neither soil nor sunshine, will rival tomatoes in Vitamin C, will be free of waste in preparation and can be cooked with little fuel and as quickly as a ... chop." -Dr. Clive M. McKay, Professor of Nutrition at Cornell University.
 Dr. McKay was talking about sprouts. (To see the wonderful nutritional value of Sprouts, see sprout info below the tutorial)
I'm going to teach you all how to sprout alfalfa seeds in your kitchen! It's awesome! My daughter eats sprouts on everything now. She even asked for some on her scrambled eggs the other morning which I hesitated at at first, but heck, why not? She finished the sprouts and left some of the eggs unfinished. LOL I have felt so good since I made these sprouts part of my daily diet, so naturally I want to share the wealth!
First, you need:
-Alfalfa Seeds
-2 Quart Wide Mouth Jar (I recycled a large Mott's applesauce jar)
 -a mesh strainer * (I did my first batch without this, but it's easier with it)
-water
Place 1-2 Tbs alfalfa seed in a 2 quart wide-mouth jar & cover w/water overnight.

The next day, pour off water using a small mesh strainer& rinse the seeds. Drain off any and all excess water so seeds will not spoil. After everY rinse, lay jar on it's side and spread the seeds out as much as you can with a butter knife.

For the next few days, keep seeds rinsed to keep them from drying out, straining after each rinse making sure all excess water is removed and lay back on it's side. (I just do this whenever I come into the kitchen)

About the fourth day the seeds begin to sprout white tails. Place them in the sunlight for a day or two so they will turn green in color. **to have them sprout after 1 day see my note below

 Once sprouts are about an inch long, or after one week, place moist green sprouts in an airtight bag or container and put them in the fridge for keeping.
Sprouts should be used within 5 days.
Sprouts can be used in soups, on steamed veggies, as lettuce for sandwiches, burros, baked potatos, and salads. They are full of vitamins, minerals, and live enzymes.
The above suggested amount will give you a 2 quart jar full of sprouts.
*Some people like to take a piece of nylon and a rubberband to cover the jar so that you can strain the sprouts easily
** in the initial soak I add a few drops of kelp (you can get this at most gardening stores- it's great for helping plants in distress such as transplant shock as well.) I also keep them in the sunlight from the very beginning. I think a combination of the two has made it so my alfalfa sprouts after about 30 hours instead of the 4 days stated.
SPROUT INFO
It is really only in the past thirty years that "westerners" have become interested in sprouts and sprouting. During World War II considerable interest in sprouts was sparked in the United States by an article written by Dr. Clive M. McKay, Professor of Nutrition at Cornell University. Dr. McKay led off with this dramatic announcement: "Wanted! A vegetable that will grow in any climate, will rival meat in nutritive value, will mature in 3 to 5 days, may be planted any day of the year, will require neither soil nor sunshine, will rival tomatoes in Vitamin C, will be free of waste in preparation and can be cooked with little fuel and as quickly as a ... chop."
Dr. McKay was talking about sprouts. He and a team of nutritionists had spent years researching the amazing properties of sprouted soybeans. They and other researchers at the universities of Pennsylvania and Minnesota, Yale and McGill have found that sprouts retain the B-complex vitamins present in the original seed, and show a big jump in Vitamin A and an almost unbelievable amount of Vitamin C over that present in unsprouted seeds. While some nutritionists point out that this high vitamin content is gained at the expense of some protein loss, the figures are impressive: an average 300 percent increase in Vitamin A and a 500 to 600 percent increase in Vitamin C. In addition, in the sprouting process starches are converted to simple sugars, thus making sprouts easily digested.
One pound of alfalfa seed will yield 10-14 pounds of fresh mini-salad greens. Whether you are on top of a mountain or in a bunker with artificial light, you can still grow this fast, organic food.
Yes, it is fast food, but you won't be sacrificing any nutrition. Alfalfa sprouts have more chlorophyll than spinach, kale, cabbage or parsley. Alfalfa, sunflower, clover and radish sprouts are all 4% Protein. Compare that to spinach - 3%, Romaine lettuce -1.5% and Iceberg lettuce- 0.8%, and milk -3.3%. These foods all have about 90% water. But meat and eggs are the protein foods for Americans. Meat is 19% and eggs are 13% protein (and 11% fat). But Soybean sprouts have 28% protein, and lentil and pea sprouts are 26%. Soybeans sprouts have twice the protein of eggs and only 1/10 fat the fat.
Alfalfa, radish, broccoli, clover and soybean contain concentrated amounts of phytochemicals (plant compounds) that can protect us against disease. Canavanine, an amino acid analog present in alfalfa, demonstrates resistence to pancreatic, colon and leukemia cancers. Plant estrogens in these sprouts function similarly to human estrogen but without the side effects. They increase bone formation and density and prevent bone breakdown (osteoporosis). They are helpful in controlling hot flashes, menopause, PMS and fibrocystic breasts tumors.
The sprouts contain 10-100 times higher levels of these enzymes than do the corresponding mature plants.
Alfalfa sprouts are one of our finest food sources of saponins. Saponins lower the bad cholesterol and fat but not the good HDL fats. Animal studies prove their benefit in arteriosclerosis and cardiovascular disease. Saponins also stimulate the immune system by increasing the activity of natural killer cells such as T- lymphocytes and interferon. The saponin content of alfalfa sprouts multiplies 450% over that of the unsprouted seed. Sprouts also contain an abundance of highly active antioxidants that prevent DNA destruction and protect us from the ongoing effects of aging. It wouldn't be inconceivable to find a fountain of youth here, after all, sprouts represent the miracle of birth.
Wednesday, September 3, 2008
Unintentionally Green and loving it!
 Ok, so I was (ok, am) the type of person who scoffs at tree huggers and this whole green movement, so how how did I get to this place where I am vermicomposting with worms under my sink, using organic materials to fertilize (kelp), enriching my soil with Vermiculite and composted horse manure, and reusing playdoh containers for my window sill herbs??
 Here's how: I've been going to an organic gardening class for a month now given by a woman in my community named Beverly. She is a walking gardening encyclopedia. She can tell you which plants will help your skin, blood pressure, teeth, sinuses, what will make your hair silky smooth, and even plants that will replace the "little blue pill" (these ones grow as weeds in my backyard). I already wanted help getting these dumb plants to thrive in the Arizona heat, but she has taught me way more than I expected! If you're in the area, she teaches a hands-on class every other Saturday morning at 6am. The next one is this Saturday the 6th and she charges 5 bucks a lesson. You can ask her whatever you want and she always has super helpful handouts including when to plant different types of veggies in this area, and good organic recipes for potting soil. If you're interested you can email me and I'll tell you where to go. These little 1 week old beauties are a tribute to her teaching skills. (they came up after 3 days because of all the rain- it also tranplanted seeds to the other side of the pots. Oh well) Thanks Beverly!
Mixed Salad Greens (and flowers)

Sugar Peas

Pie Pumpkins, Canteloupe

Chatantais, Zucchini (I can't remember what those tiny plants are that I put in the middle/left- I guess it'll be a surprise!)

And here is the next place to plant as soon as I get my composted equine manure to help the soil!!! (yes, these are the fences!!!! they are a little dirty after the crazy rain and wind- I haven't cleaned the splatters off yet. If you're wondering what that table thingy is in this picture, go to this post)

Saturday, August 9, 2008
Trash to Treasure....

Ok, so the other day I was on my way home and saw some miniature picket fences propped up against the dumpster. Of course I had to throw them in the car and take them home. I have outlined the place I want to put them, now all I have to do is nail the posts straight , sand them, have my kids paint them white, and nail some stakes to the back so I can pound them into the ground. After that's all done, I have to dig out at least 6 inches deep by however big this area is and replace the packed dirt with good, nourishing, airy soil. And then plant. Obviously it's going to take a while, but I have to get it done before I need to plant which will be the beginning of October. So here are the beginning pictures:


I'll post the after pictures when I'm done.
One neighbor, when she saw these at my house, said "Oh my gosh you DID NOT! I saw them by the dumpster and then they were gone. I'd wondered who took them. I should've known it was you!" Another neighbor said that when he drove by the dumpster he thought, "Someone could take those and fix them up nice. I bet Stephanie could find something to do with them." Well, I have. :o) Is it sad that people see junk by the road and think of me? LOL
Wednesday, July 30, 2008
Gardening and Wormins
Last week I went to an organic gardening class and I am so excited to start gardening! I went straight home and the kids helped me plant Borage (an herb related to mint), basil, parsely, cilantro(coriander), pumpkins, acorn and butternut squashes, giant white radishes (they look like long fingers), canteloupe, bush beans, forget-me-nots (Megan calls them don't-forget-me's), shasta daisies, and sunflowers. I'll post pictures when all of these sprout. what fun! We are also Vermicomposting- which is composting with worms. You just feed them your left over greens and fruits and veggies and they turn it into the other "black gold" that's extremely good for your garden. They also love eggshells. Yummy yummy.


The kids are so excited about it and want to show everyone their wormies when they visit. Right now we have so few worms that they are in a little plastic container with holes poked through for air, but when they breed we'll have to move them to a large container. I chose to do mine inside under the kitchen sink in a sealed container, because I've seen outside ones that friends have done and it attracts all kinds of bugs. I went to Starbucks and got their free coffee grounds because they're really good for plants and the worms LOVE them (supposedly). If you want to learn more about vermicomposting, Martha Stewart did a cool tutorial on her show about it, although she doesn't do it exactly right, but the article that's with the video says the right way to do it. Here's the link
She doesn't really instruct you on how to harvest the compost, but all you have to do is bring the compost to the top of it and bring the container into the light. All the worms will go down away from the light and you just wait for them to get out of it and take it away to use as a fertilizer or plant starter. Use can also use the worm wee (urine) just make sure that you set your composting container on top of a collecting tray. Prop it on top of something so that the liquid can exit and collect. then you take it out and dilute it to use as miracle grow- the cheap and natural version. I know this sounds wierd, but it's so interesting to see how the planet works. What wonderful creations God has made!
Tuesday, May 13, 2008
Carrot, anyone?
 A few months ago the Ward Young Women came and planted carrots and peas in our backyard for one of the girl's value project. The peas are long gone and were VERY sweet and yummy. Any time we went outside, we got a few pods to chomp on while talking with neighbors. Well, the greens of the carrots were getting tall so I picked one to see how big they are right now.... not very. -and they're bitter. I guess we can be patient and wait for them to get big and yummy.
Subscribe to:
Posts (Atom)

 Posts
Posts


